PSP 3K Disassembly Guide
This page will walk you through all you need to know on how to disassemble your PSP 3000 so it is ready for the PS Placeable build. There is a fifth revision of the PSP with a mother board number of TA-95. the internals of that board look different but should disassemble all the same.
PLEASE IF YOU WANT CFW INSTALL THAT BEFORE FOLLOWING THIS GUIDE. Firmware guide
Removing internal screws
There are 6 internal screws holding down a few different parts. You can remove them all at once. Remember to save these we need them as well.
Please also save the small white part that holds the right bumper in place. We will need that part as well.
Some 3000 models do not have all these screws they only have 3 and the white parts do not have screws holding them down. If that is the case you will not need that small white part.
Remove left and right pads
-
Make sure you pull out the SD card if inserted and the cover should be in the pulled out position to remove the left plastic piece. Look at the picture from the last step for an example.
-
The right button pad can be pulled up; it is taped to the board so use a bit of force to pull up on it.
Set screws and PSP aside you finished taking it apart!
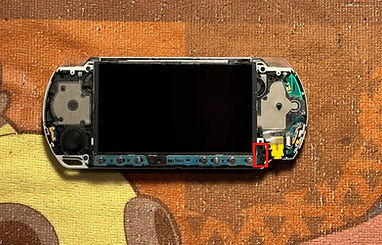
Hold on to your screws and your PSP Yours should look like the picture below minus the right bumper just the white part screwed back into place to keep the motherboard held down.
we are ready to move on to the next step. Click the button below to move on directly to the 3k build guide.


.webp)


_edited.jpg)
.webp)
.webp)
.webp)
.webp)

.webp)
